I was overjoy figured out how to use Crossdresser 3.0.1, but then there are quite some limitation that I am to live with:
- Crossdresser doesn't do well on converting shoes or any sort of footwear.
- Crossdresser may not always convert clothing perfectly even when I do all the right setting. The Mongolian gown virtual cloth I brought is one of the example.
In fact I need to check around and see if there's others who have the same problem as I do.
Sunday, August 03, 2008
Saturday, August 02, 2008
Finally really figure out the power of CrossDresser 3.0.1
I finally figure out how to use CrossDresser 3.0.1 effectively. The sad part (about me) is that the application is supposed to be pretty easy to use, but because of my stubbornness of not reading the manual in the first place, and then made some wrong assumptions, as the result it took me almost a day to get the convention going to way I want to go.
My biggest mistake was that I forgot to set the "From" drop down. Thus the converted address were always not conformed properly. And I kept banging my head wondering why result was so different from what I expected.
Second, I didn't realized the Vicky 2, Vicky 3, Vicky 4 actually means Victoria 2, Victoria 3 and Victoria 4. Thus I was kept puzzling about how I could set the target or source to Victoria, since the drop down only has Vicky 4.
Let me continue my conversion journey. This is great. Now Miki 2 and Gina (Preteen Girl) has more costumes to wear.
Sunday, July 27, 2008
Daz Studio 2.2.2.20
2.3.3.15 is just too darn crappy! It crashes time after time when I try to do something as simply as reorganizaing the catalog. I really couldn't stand it any more. So I am rolling back to the 2.2.2.20 and see if it's any better.
Used 2.2.2.20 for several hours. No crashing ... good ...
Used 2.2.2.20 for several hours. No crashing ... good ...
Saturday, July 12, 2008
Big mistake with Daz Studio 2
I found out, today, that I made a big mistake regarding to organizing my Daz Studio resources. Instead of putting all my content files in Daz Studio's main content directory (under Program Files), I put them in the Q drive of my desktop machine. My rational was that it will give me flexibility of detaching the content from the main application, in case I need to rebuild the OS partition.
The problem is that by doing so, it makes backing up the whole Daz Studio environment difficult. After I installed the application, I started to use the Daz Studio database to organized my content. So now some reference in the database pointed to C: drive while others are pointing to Q: drive. That means if something goes wrong, and I need to replicate the environment, I have to put some content in C:, and then some content in Q:.
I also realize that it's impossible to consolidate folders. If you move the folder, Daz will lose track of your content, and all the work you did on organizing the content will be lose.
So now I kind of have a mess on hand, which is really not the end of the world, but I definitely will do it differently if I can do it again.
Wednesday, July 09, 2008
Taking back my words :-<
After trying it a bit more, a realized that Metasequoia 2.4.8 really isn't as Tablet PC friendly as I expected. Oh well.
Tuesday, July 08, 2008
Metasequoia 2.4.8 ,,,, Tablet friendly!
Most of the 3D modeling application I used so far has some serious problem with Tablet PC. Navigation on the screen (like move, scroll) usually goes crazy when I use stylus. That's why I was slightly surprised to find out that Metasequoia 2.4.8 does not have that kind of problem. Sure I need to play a bit more, but it seems very promising.
Monday, July 07, 2008
Metasequoia + Texture mapping = knocked me out for 10 hours
I fell into sleep because was the struggle with a 3D application called Metasequoia. Getting it to do basic modeling it's OK. In fact it's almost fun. However, I have major hardtime using it to do Image mapping. After struggling with it for more than half a day yesterday, I decided to roll back from the current version (2.4) to a much older version (2.1 beta). At least there are some tutorials online that I can follow for the older one.
Friday, July 04, 2008


Finding clothes for Gina
It all started when I found a 3D model that looks very much like my friend. So I wanted to pose some scene using that model called Gina. That's when I realized that the model is derived from Daz Milliumn PreTeen model, and that model does NOT have a lot of ready made hair, clothing and props to use with.
I resolved them problem by using Aiko 3's hair, and then decide NOT to apply "Fit To". That allows me to free to adjust the positioning of the hair. All I need to do, at the end, is move the hair to the head level of hireachy of the model and then all becomes fine.
Next, I need to make some clothes for Gina. Luckily, there's a software called CrossDresser 2.5.1. So I can use the tool to convert clothing form "Aiko 3" to "Preteen Girl". The conversion is not perfect, and it's a bit like trial and error. But at least there is a way. Each conversion takes from 15 seconds to 4 minutes.
After some twisting here and there, I got a ballet scene setup. But after I rendered, I found that there's no shadow casted on the floor, which makes the scene looks very strange. That's when I realized that I need to adjust the "Shadow" setting of my distantlight source. I picked "Raytraced(Software Only)" as Shodow Type and found that it takes A LONG TIME to render a scene. In fact, it took 20+ minutes to render the scene, and it doesn't look particular better than the "Deep Shadow Map version", which takes much shorter time to render.
Saturday, June 28, 2008
Still couldn't find a converter to convert .bip to .bvh
I spent almost 2 hours and still couldn't find a way to convert .bip (motion capture file format for 3D Studio Max Character Studio) to .bvh (something Daz Studio can use, sort of). Some mentioned a way, but I don't have that motion builder application. What a bummer.
Faceshop, wow
I accidentally came across this Daz Studio plug in called FaceShop. The Basic version is now free, but it only works with version 2.2.2.17, which is still in beta right now. So I better wait for the release of 2.2.2.17 before I mess with it.
Finally, Aiko 4's eyes are not messed up
I was struggling for 2 hours (how many times did I write an introduction of my blog like this) with Daz Studio 2.2 trying to figure out why Aiko 4's morph was not working. Result: Aiko 4 got a very tiny eyes, and when I tried to slide the Aiko morph parameter nothing changed except the size of the model's head. That's a very creepy look.
I finally got my answer by reading the Daz 3D forum. Solution: Reinstall Aiko 4, and eveyrthing will be working fine.
I finally got my answer by reading the Daz 3D forum. Solution: Reinstall Aiko 4, and eveyrthing will be working fine.
Sunday, June 22, 2008
3D Bridge for Photoshop is no longer free
I didn't really dig into 3D Bridge for Photoshop from Daz (for better integration between Photoshop and Daz Studio). To me, all I really care is find a way to export rendering image to a format that support layering, so that I can integration the scene rendered in Daz Studio into my photoshop work. And during the beta period, this is the only thing I used it for.
Guess work, the beta period for 3D Bridge is over. The final version has been released, and Daz started charging US$199 for it. I definitely don't have that much money, but I found a solution: .PNG file format. As long as I set up Daz Studio so that it render stuffs using .PNG, I can reopen the files in Photoshop, and integrate the rendering on my drawing. That's kind of my poor man version of 3D Bridge.
Guess work, the beta period for 3D Bridge is over. The final version has been released, and Daz started charging US$199 for it. I definitely don't have that much money, but I found a solution: .PNG file format. As long as I set up Daz Studio so that it render stuffs using .PNG, I can reopen the files in Photoshop, and integrate the rendering on my drawing. That's kind of my poor man version of 3D Bridge.
Saturday, June 21, 2008
Found a clumsy way to import Lightwave 3D 8.5 models into Daz Studio
I enjoy using Lightwave 3D 8.5 since it works well in a "portable application" setting. However, I have hard time exporting or important anything to and from Lightwave to other format besides ".lwo". I tried making sure that all the plugins are being installed by:
So then I need to find a way to convert .lwo to .obj . Eventaully I found this solution:
- Opening Lightwave 3D 8.5
- Click [Utilities] tab
- Click button "Edit Plugins"
- Click [Scan Directory] button
- Point to the plugin folder
So then I need to find a way to convert .lwo to .obj . Eventaully I found this solution:
- Open Shade 8
- Import .lwo file
- Export .obj file.
Friday, June 20, 2008
Finally done with the costume
I spent several nights to prepare the costume texture for the girl on the left. It looks OK I guess.


[3D Studio Max] Show map in viewport
After you set image map in 3D Studio Max, don't forget to set "Show Map in Viewport" so that you can see your texture in viewport.
Thursday, June 19, 2008
Get back missing toolbar icons in 3D Studio Max
Somehow when I open 3D Studio Max today, I found all the icons on the main Toolbar DISAPPEARED! Eventually I used the following way to restore the toolbar back:
- Select menu [Customize][Costume UI and Default Switcher...]
- Select "Max", "Default UI", click [Set] button.
- Restart the application.
- Select menu [Customize][Costume UI and Default Switcher...]
- Select "Max", "Default UI", click [Set] button.
- Restart the application.
Daz Studio 2.2 "Optimizing Images..." problem irritates people!
I was stuck with the notorious Daz Studio "Optimizing Images..." hanging problem this morning. It was very fustrating as even the newest version of Daz Studio (2.2.2.15) doesn't resolve the problem. I looked into the forum, and found this post and this post that might help resolving my problem. It's really irritating indeed.
Oh Stupid me about Daz Studio
Just found out that to refresh the bitmap, all I need to do is select [Refresh Images] from the menu. No need to reload the software.
More about Daz Studio
Daz Studio, being in version 2.1.1.13, is still not too stable. In fact, just a while ago, I had to reboot my machine to get Daz Studio up and running again. Still, this is the best I can get for have a virtual stage.
While I was working on preparing texture for 3D model, I found that the wrap Transformation tool is such a powerful tool. It's like of like the Mesh transformation in Illustrator, but not as fine grain. Still it's such a powerful tool that makes me wonder why I didn't use it before.
I also found out a while ago that I need to reopened the file again in order to get all texture loaded properly even after a texture JPEG file got updated.
Wednesday, June 18, 2008
[Adobe Illustrator CS3] Check Transparency before converting image to mesh object
Last night I made a mistake and turned an hour plus work into something not so useful.
Basically I try to put some real world clothing pattern on a texture mapping template I created on Adobe Illustrator CS3. Everything went well. But before I convert a texture (JPEG image) into mesh object so that I can wrap it on a texture mapping template, I changed the image's transparency BEFORE converting to mesh object. That's NO NO because after the convertion. The low transparency became 100%! That means I can never get back to the original transprency.
So next time I should remember to FIRST convert a bitmap into mesh object BEFORE I change the transparency value.
Monday, June 16, 2008
No Tiling on Daz Studio
Just found out that Daz Studio does not support Tiling Texture. Everything has to be done in UV Mapping style.
Mesh
Long time ago I wrote an article about how to turn JPEG into mesh object in Adobe Illustrator by selecting "[Object]->[Envelop Distort]->[Make With Mesh...]" command. I just found out that on CS3, I need to click the [Embed] button to embed the drag-and-dropped JPEG file first before I can access the "Make With Mesh" menu.
Monday, June 09, 2008
Found a solution to get rid of reflecting eyes
Thanks for all the reply!
The solution is selecting the "5_Cornea" surface, and then set the "Specular, Glossiness" to 90%, and boom the ultra reflective eyes are gone. Awesome.
The solution is selecting the "5_Cornea" surface, and then set the "Specular, Glossiness" to 90%, and boom the ultra reflective eyes are gone. Awesome.
Sunday, June 08, 2008
Found out how to save expression in Daz Studio
I have to say that I am pretty piss right now as I wasted 1.5 hours trying to figure out how to save Expression in Daz Studio 2.1. Eventually I found it. but damn it for lossing my 1.5 hours.
Basically I am following the instruction at Daz web site, but since that article was written for older version, some minor stuffs was changed.
Before saving, you should create a folder to store your own setting. I have a habit of putting my own Daz Studio content in place other than the application installed directory. However, make sure that the content directory you used to store your custom expression is under "Daz Studio Content Directories" instead of "Poser Content Directories". I made that mistake and thus my saved expression was never show up.
If everything done right, you should see the folder name you created to store expression showing up at "Uncategorized" group.
If you don't see your expression showing up, check the following:
- Make sure the your content path is in the preference. For some stupid reasons sometimes the path will disappear. And you have to add again, so do check.
- Do "Search for Content" so that the UI can be refreshed. That should load your expression.
- Setting up your active screen in a way that you want the icon to look like. I perfer using "Front View", and how the head zoomed in so that I can clearly see the expression.
- When saving, simply:
- Navigate to your Daz Content Folder.
- If it's a new category, create a new folder and save your file in it.
- On "Save Pose Preset Options", take the default, which is "Current Frame Only" and "Record Custom".
- MAKE SURE you check the check box for the character (like Victoria 4), otherwise all your effort will NOT be saved even though the icon looks good.
- Also MAKE SURE that you check the right sub-hierarchy. Otherwise the pose you save may affect the whole body. For instance, if you just want to save the facial expression. You see check the "head" check-box in the hierarchy ONLY.
Finally figured out how to move multiple objects in Daz Studio 2.2
The method is much simpler than I thought. Simply create a null object as a place holder as your group. When you need to move something as a group, move those item into the null object. That way, when select the null object (from scene hierarchy) you move the whole group of object around. Simple as that.
Now if I know how to save facial expression .....
Now if I know how to save facial expression .....
Monday, May 26, 2008
crashy Poser 7
I just updated Poser 7 from 7.0.0.63 to 7.0.2.132 by applying Service Pack 2. Hopefully it will crash less often.
Continuous struggle with Poser 7 (to make costume for Daz Studio characters)
After weeks, I am stupid struggling with making costumes for characters in Daz Studio. Neverthesless, there' some slight progress, and that's why I am trying to jot down some notes for myself.
- Definitely check out the Creating Conforming Clothing For Poser Figures article at Smith Micro web site. I will definitely stuck for long long time without that article.
- Definitely need to save constantly. Poser 7 seems very fragile when dealing situation it didn't expected. While I was still in learning mode, I had to constantly start Poser 7 again after doing something not in the "right way".
- When creating bones, make sure that you know what is the "base" of the new one that you are about to create. Haven't said that it's actually no big deal for making mistake since you can always manipulate the hierachy by bringing up the hierarchy window, and the drag and drop the bone structures.
- Sometimes you make create more bone than you need. Delete them first before naming, or otherwise some funky thing may happen.
- AT first I found out that it's much easier to name the bones right inside the Hierarchy window than using the property window since the property window shows both the name and the internal name, and I was like "why the hell should I care about the Internal name"? And then later I realized that the Name is the display name, and it's the internal name that has to match the group name. Very critical a step.
- Remember the click the "Auto Group" button at the end of the rigging process, otherwise the costume will act like it's breaking apart.
- Make you study the corresponding joints you try to conform with before doing rigging. All parts have to match, or otherwise you will get strange result. You can do it by loading the figure in Poser 7 and then go to [Setup] area. For example, for me, I load Aiko from the library at "[From Original - DAZ Aiko 3]".
Wednesday, May 14, 2008
Poser 7 not portable
Well, just found out that Poser 7 is not portable friendly. But I have to install it in order to creating clothing for Daz Studio.
Tuesday, May 13, 2008
Question about making clothing
Here's where I posted my question:
------------------------------
Information about making costume for Daz Studio using 3D Studio Max
I have problem finding the props and costume for scenes that I want to create in Daz Studio, and decided that I should start creating props and costume using 3D Studio Max. I have no problem creating props, but I don't know how to create costume.
I found some instruction about creating basic clothing with 3D Studio Max, but it seems to rely on Poser to do the fitting with Cloth simulation. Is it a must to have Poser in order to create clothing for Daz Studio? Any information about creating clothing on 3DSMax (I am using version 9) for Daz Studio?
Honestly I am a lazy person so if I could buy it I would. But I could find any Mongolian gown and other Chinese minority costume (like Xinjiang) for sale. Plus I love to contribute my work in open source just to show my appreciate for all the free stuff and help I got so far. And I love pretty costumes :->
Thanks!
Deecay
Sunday, May 11, 2008
3D Studio Max 9 with BodyPaint 3D 3.111
My previous BodyPaint 3D experience was pretty bad. In fact, it was almost horrible. So I wasn't too thrilled when I started trying BodyPaint 3D version 3.111 with 3D Studio Max 9. It turns out that it was a much more positive experience then I expected.
Just like the older version, BodyPaint 3D 3.111 is a portable friendly app, as long as you have the valid serial number. But the magic comes when you installed the BodyPaint 3D plug in for 3D Studio Max 9 by copying the 2 plug in files into the folder (...\Autodesk\3ds Max 9\plugins). And then start 3D Studio Max 9, go to the [Utilities] menu, and click [more ...]. You will see 3DBodyPaint in the list. Click it to start the "utility". In fact, 3D Studio Max even picked up the BodyPaint 3D Path before I clicked the "Set BodyPaint 3D Path..." button.
To bring a model from 3DS max to BodyPaint, simply select the object, and then click [Export Selected]. BodyPaint 3D will be launched and your model will be loaded. To get back to 3DS from Bodypaint, just click the button at the left column.... (you will see the 3DS icon there).
The trick is that once you are in 3DS, you need to first create the material to paint on by click ...something ... at the lower right corner ... kind of like adding new layer in Photoshop. Once done, you can directly paint on the object. Pressure sensitive also works, but you have to explicitly check some checkbox at the upper right side of the screen.
So far I enjoy it. I just need to know more about how adjust the UV mapping map ... and ... a lot more. Hey at least I got some texture on my model.
Wednesday, May 07, 2008
There's lighting addon for Daz Studio?
I didn't realize that there's lighting plug in for Daz Studio, like Light Dome Pro and UberEnvironment . They could come in handy as I spent more time doing scenes.
Oh, also some very BASIC information about lighting in Daz Studio. I should spent sometime on this before spending any money on third party solution.
And then, more Daz Studio tutorial.
Oh, I also didn't realized that Blogger blog editing is totally functional in a pure text mode (with no bitmap on the page).
Tuesday, May 06, 2008
Importing old Poser 4 files to Daz Studio 2.1
I tried importing some old Poser 4 files to Daz Studio 2.1. It worked, but since the original model rely on a lot of parts from the Poser 4 application, so I took a look at Poser 7 and see if there's any same parts that I can use. It turns out that most of the Poser 4 files are available on Poser 7, but they are all zipped in .obz format. To turn them into regular .obj file:
That's it. Very simple. There were still a few texture files missing, but they affect my model, so I wasn't care about them at all.
- Rename the file extension to .zip.
- Unzip it, and a obj file will be automatically expanded as the result
Easily opening multiple catalogs in Portfolio 8.5
I just found out that I can open multiple Portfolio catalog files in Portfolio 8.5 by drag the actually .fdb catalog file into the Catalogs windows. However, no other kind of files, including shortcuts, are allowed in the batch you drop in, or else the multiple open won't happen.
This is very handy to me. Now I can search all my photos all the way from 1997 til now.
This is very handy to me. Now I can search all my photos all the way from 1997 til now.
Daz Studio and Shadow
I realized one huge problem with the work I did on Daz Studio so far: the characters didn't cast any shadow. Even for the one that cast shadow, it doesn't look realistic enough. I guess I need to spend sometime to figure out the trick of casting better shadow.
Monday, May 05, 2008
Powerful skin feature
Ever since someone on the forum pointed me to the skin feature of Daz Studio, I found myself addicted to it, and realized how much possibility it opens up.
Not only I can specify the surface type (skin, plastic ....), I can also replace the primary color of the service. So a white gown can be turned into a pink gown with just a specify the surface color. Of course it's definitely not as natural as changing the texture file of the the selected surface.
That brings to something even more exciting: I can even replace the image map file associated with the surface. That opens up tons of possibility of totally changing the look of a model.
My next step will be trying out the shadow casting ability.
Sunday, May 04, 2008
BodyPaint3D
I kept trying to learning BodyPaint3D to do texturing. But every time I try to pick up, the steep learning always put me down. In fact, I recently get back to 3DStudio Max 9, and hopefully the new version will be more texturing friendly.
Glossy Glove

This is how to make the glove glossy in Daz Studio.
Procedure:
- Select menu [Tools][Surfaec Selection]. Move your cursor around to figure out what area is in what name. In my case, it's 3_SkinforeArm and 3_skinHand.
- Opend the "Surfaces" tab. Within it select advanced tab, change the Lighting Model for the above two items to "Glossy (Plastic)".
- Render using software rendering.
- Done.
Saturday, May 03, 2008
Lame hat
I think I finally have to admit that while SketchUp Pro 6 is easy to learn and easy to approach, it just doesn't have all the modeling capability I need. For instance, to create a 3D XinJiang hat with SketchUp, I ended up with this. Pathetic isn't it. So I am starting to mess with 3D Studio Max starting today. Wish me luck.


PVC Glove
I just posted a question about my straight PVC Glove problem at the forum:
So let me get this straight: to get the best rendering result, I need to use Software Render. But since software rendering doesn't use GPU on the graphic card, the only way to improve rendering performance is by getting a machine with faster CPU (or more CPUs)? Oh well, I am glad that I went for a QudaCore Processor when I got a new Dell 6 months ago.
Actually, I didn't know that use Hardware render (OpenGL on my graphic card) doesn't give me all the effect Daz3D provided until recently. But even then I couldn't seen to get everything right. For instance, I used PVCGear dress in this picture: https://blogger.googleusercontent.com/img/b/R29vZ2xl/AVvXsEjCGYc2412BR8t-DPCNrRcV5mr1pAeRoGuNxr39_xcwjInWJ1jW6UDbme9bqidZvWd2DTgTSvr2E_wM2NWsktKbEzy3mWaCGl0TjO8AW_84OVc70QWo0a3j_vRtmeFaDICUle-J_Q/s1600-h/saveme.jpg
The dress was fine, all glossy. But the glove doesn't seen look as glossy. I tried both hardware and software rendering and seems to get the same result. What did I do wrong?
Opening Daz Studio database
It's so fun to use Firefox with SQLite plug in to view data in my Daz Studio 2.1 database! Just open the file "C:\Program Files\DAZ\Studio\resources\Content" and boom I see all the mapping. And great that now I know where to backup the database.
Database of Daz Studio 2.1
Thanks to the people on the Internet, not only I now know that the Daz Studio 2.1 Content Management database is storing at ..../Studio/Resources/Content , I also know that it's in SQLite format, and I can access it using a Firefox extension.
Friday, May 02, 2008
More on Daz Studio 2.0
I spent almost a whole day to mess with Daz Studio 2.1.1.13. Although I won't say now I am an expert, at least I can curse around the application and get some work done. Here's some of my finding.
- Most of the old Aiko 3 clothing doesn't work with Aiko 4 anymore.
- To import another Daz3D library, you need to add an entry in [Peferences][Directories], and remember to select "Poser Content Directories". I found out that if I use "DAZ Studio Content Directories", it won't work.
- But even after putting the right path, I still experienced problem as I could find the contents I newly installed. Turns out I have to click on the side way triangle located at the upper right corner of the Content panel, then select "Search For Content ...". Now you got a chance to refresh the content database. Once refreshed, you should be able to find your content.
- The search feature and organization feature provided by DAZ Studio 2.1 is simply awesome. Now finding content to use is so much easier, and I don't to remember where to find what in the application. I just go to the catagory I defined and boom there they are. Major break thru I would say.
- You definitely need to save frequently. The application tends to crazy once in a while for no good reason. The app is not unusable, but definitely can't be called stable. So save frequently.
- I didn't realized until late yesterday that (at least on my machine) only the software rendering will be able to render all the fancy effects and such properly. Maybe I just don't have a capable graphic card to do fast hardware rendering? Cause software rendering is, while not dog slow, takes about 30 seconds to a minute to render a scene.
- When you add hair (works like a wig to me) to your character, sometimes you need put it under the head node in the Scene hierarchy tree. This is particularly tree to those pre-Aiko 4 days hair. Merely doing Fit-to doesn't do the job (well at least that was what happened to some of the hair I tried.
- I successfully imported an object I created from SketchUp 6 into Daz Studio with all the texture mapping. This makes is much easier for me to create my own content.
- Somehow the glove I created using PVC-Gear didn't look as shiny as the sample rendering looks like. I wonder what I missed.
- I need to learn how to use light to create better effect.
- I need to learn how to use camera and animation to do some nice short animation short.
- I need to know where the compiled database of Daz Studio is being stored so that I can back it up and won't waste all the time I spent on organizing the content because of a harddisk crash.
- I need to figure out how to create my own dress.
- And finally, I need to create the XinJiang hat that I promised myself to create for days.
Tuesday, April 29, 2008
OBJ seems to be a much better format
I used Sketchup to create a XinJiang knief and think of using it with PaperVision3D, but I tried and tried and still couldn't get it load up properly. Meantime, if I export the model as .obj, then I can easily use it in DazStudio. Seems like .obj is a much better to use with. I am also glad that all the texture mapping I did on Sketchup got reserved in DazStudio.


Monday, April 21, 2008
Use Flash Player Standalone to debug Actionscript 3.0 Application
By default Flex Builder 3 will create a html for your Actionscript project, and then use it to debug your Actionscript application. I much rather use Flash Player Standalone instead, so I made the following changes in my project.
- Select [Run][Debug][Others...]
- In the "Create, Manage, and run configurations" window, uncheck the "Use defaults" checkbox. Now manually changes all entries to reference to ......swf instead of .... html . This will launch your default swf file player. If necessary, set the default application of .swf to the Flash Player Standalone application.
- Important: make sure that the standalone player you use is a Debug version. You will find it when you download the Flash Player 9 package form Adobe. Unzip the .zip and you will find the Debug version.
Using Flex Builder 3 to develop Papervision3D 2.0 (Actionscript 3) application
Here's the steps I used:
Prerequisite:
Prerequisite:
- Install "Install Flash Player 9 Plugin.msi" (from the Flash Player 9 Update package). That way, when Flex tries to language the application for Actionscript, it will launch your feault browser, and Flash Player 9 will be loaded properly for your 3D fun.
- Launch Flex Builder 3.
- Create a new Actionscript Project
- In your project property, selecPublish Postt [Actionscript Build Path], then under [Source path] tab, select the folder of your 2.0 alpha source folder. In my case: "Q:/Apps/Development/Papervision3D/2.0 alpha/src"
- Write code.
- Compile
Sunday, April 20, 2008
Papervision3D 1.5 (instead of 1.7 Beta)
Yesterday I directly grabbed the 1.7 beta from the subversion server. It was working fine with most of the examples found at this site, but there were some that didn't work out, so I thought maybe I should try the stable 1.5 version. So I downloaded it, explain it, put it my ...\Development\Papervision3D\1.5\src folder, and point the ClassPath to it. Well, those projects that failed .... still failed. But at least the successed ones still work fine, with slightly different behavior. For instance, in the 1.7 beta the system was not complained about the missing texture jpeg when needed, while 1.5 do complain about it.
I also need some offline documentation, so I downloaded the source with docs here.
My next stop will be spending some times with these examples, play with them, and see if I can made something useful out of them. That includes:
I also need some offline documentation, so I downloaded the source with docs here.
My next stop will be spending some times with these examples, play with them, and see if I can made something useful out of them. That includes:
- Try loading the 3D models I created in SketchUp 6 Pro
- Try loading textures that are not JPEG (or check to see if it support transparency on PNG)
Flash CS3, crashed
Stupid Flash CS3 Pro Portable suddenly crashed while I was in the middle of messing the PaperVision3D Tutorials. Gee, what the heck is going on?
Saturday, April 19, 2008
Papervision 3D
The new bizz in Flash town is Papervision 3D, a open source free engine that allows you to create 3D content for your Flash animation.
- Awesome blog about sites that created using PaperVision3D.
- A demo of undersea view, using Papervision 3D.
- Tutorial mainly on creating 3D texture mapping using 3D studio Max.
- More tutorial on making 3D environment texture using 3D studio Max
- Tutorial on PaperVision3D 2.0
- Easy to following Getting Started steps in FAQ
- A great site done with Papervision3D, showing off how 3D persepctive can be done.
- EXamples on PaperVision3D that you can download.
- PaperVision3D Source Code
- Main page on papervision3d FAQ
- More showcase on the power of Papervision3D
- PaperVision 2 is coming, and here's some tutorial
- It WORKS with the portable version of Flash CS3 professional (Yeah, I can code 3D everywhere I go!)
- The most critical thing is to make sure that the "...as3\truck\src" is in the Classpath under Actionscript 3.0 Setting. To check it, go to [Edit][Preferences...][ActionScript Tab][Actionscript 3.0 Setting button...]. If the path is not there, add it. It should save with the application. I mean, even the portable version I have works.
- On a Flash document (.fla) page, you can associate a class to it. In fact, a lot of demonstration on PaperVision3D put code in saperate .as class file, so you shall get familiar with the approach. It's actually pretty simple:
- In your hosting .fla file, enter the document class name in the Properties tab.
- Save the .fla file if it's not been saved.
- In the SAME directory of your .fla file. create a text file with .as extension with the SAME name of your class.
- Click the pencil button next to Document class textbox, and it should bring you the an editor with your .as class file loaded.
- Put your code in there.
- Compile, test movie.
- The Flash CS3, by default, won't save the files you modified before compile your movie. So make sure you save your files before testing any movie.
Monday, April 14, 2008
A Toon Boom Animation done in one day
I really didn't anticipate that it takes me almost one day (actually it's from 5 pm to 12 midnight) to finish a simple Toon Boom animation, but it did.
Most of the time I spent was on figure out the best way to vectorized a few photos into vector art that is in manageable complexity for Toon Boom. The problem is that Toon Boom cannot handle graphics that are too complicate. 1000 vector lines seem to be the limit. Too much and the application may crash. There's always a temptation to try to preserver as much detail of the original picture as possible, but in reality I may need with lower color palette range, even though it means that I may need to alter the palette manually later.
I also found that .PNG jacks up the file size dramatically. Unfortunately there's no other option as only PNG support clean transparency. It jacks up the result movie size from 120K to 500+K .
Also, I cannot animate transparency of image like JPEG and PNG. So there's an incentive to convert graphic into vector.
Toon Boom cannot directly important Flash animation. So if I have graphic work done on Flash and need to move to Toon Boom, I have to export those art work into Adobe Illustrator format first. And even then Toon Boom may complain because the latest version of .ai exported by Flash CS3 is still too old for Toon Boom. My solution was importing the exported file into Adobe Illustrator CS3 first, and then export the graphic again into .ai (CS3) format. Now Toon Boom will be able to recognize the file and import accordingly.
It is very important to realize the difference between select and then rest of the transformation tools. Also pay close attention about whether you are animating the PEG or the artwork itself.
The color palette of the graphic imported into Toon Boom seems much shaper than the original palette while it is in Flash or Illustrator format. This is strange and may affect my final art.
On the plus side, I learned even more about Toon Boom and have a better understanding about it's limitation. It would be interesting if there's simply way to move Flash animation generated by ToonBoom into high end effect application, like After Effect or FinalCutPro Motion.
Wednesday, April 09, 2008
More Toon Boom Studio 4 notes
- To use Cutout characters, drag the item from library always to way to the LABEL of the time line.
- To remove a keyframe from the timeline, first collapse the animation, then rightclick on the timeline right on the top of the cell, and select "Remove Key Frame"
- When selection tool is selection, holding ALT key will turn the selection arrow into lasso, which makes it very handy to select items.
Tuesday, April 08, 2008
Daz 2.0 released
I just realized that Daz 2.0 has been released. So I downloaded and installed it on the top of my previous Daz 2.0 installation. YOu can't do portable for Daz since it only recognize the full installed version on the host OS. But at least it's nice enough to remove the older version while keeping all the previous setting. I also download some tutorial videos in order to learn Daz 2.0.
Sunday, April 06, 2008
Strange things about Toom Boom 4
- Sometime the checker board will show up in camera will when I switch to different drawing elelment.
- When you adjust to pivot point for rotation, you should select the Peg of the element to adjust the rotation.
- those tutorial and exercise at the site are very critical. make sure you finish ALL of them.
Torturing my Toon Boom Studio 4
It took me a whole night and then I finally realized what the heck is going wrong with the pressure sensitve stylus support in Toon Boom Studio 4. It seems like that Toom Boom Studio 4 does NOT like the multiple monitor setting, and whenever I have multiple monitor setup, the pressure senstive stop work. Switch back to single monitor mode resolves the problem.
Great, now I can really get rid of Toon Boom 3, since the gradient color fill doesn't work when there's more than 2 colors.
But I am still struggle with how the peg think works with toon boom studio, and how the whole camera thing works. Maybe I just need more time to soak myself into it.
Great, now I can really get rid of Toon Boom 3, since the gradient color fill doesn't work when there's more than 2 colors.
But I am still struggle with how the peg think works with toon boom studio, and how the whole camera thing works. Maybe I just need more time to soak myself into it.
Saturday, March 15, 2008
Frustrated by illustrators' Gradient feature
After reading this article about Gradient feature comparison between Photoshop, Flash and Illustrator, I am getting pretty pissed knowing that the Gradient transformation feature I need is not available in Illustrator. This really sucks, because everytime I need to do some art work with serious gradient manipulation, I have to use Flash CS3, and then re-import the items in Illustrator CS3. Sure I can use some tricks, but that's one more hurdle between my idea and my artwork.
Sunday, February 17, 2008
Learning Manga Studio EX
I was very much enjoying using Manga Studio EX 3, but I am sure that I there's still a lot of stuff that I need to learn. For instance, I tried to get rid of the blue border around the Word Bubble and Panel Ruler, and it took me almost half an hour to figure out that I can get rid of them by unchecking [View][Show Panel Layer Area] and [View][Show Text Layer Area].
But bottomline is that it's a great tool, and I'll continue invest my time to learn and use it.
But bottomline is that it's a great tool, and I'll continue invest my time to learn and use it.
Saturday, February 16, 2008
Tablet PC as a art pad: not as great as I expected
The more I use my Tablet PC as an art pad, the more I realize that it's far from a great tool. Applications that specifically wrote for Tablet PC, like Alias Sketchbook Pro and ArtRage, works great with Tablet PC. But other tools like Manga Studio or Photoshop has serious delay problem. At least I thought it was just my machine, but after reading some forum posts, like this, and this, and also this. On my Tablet with Wacom Graphite 4, I have zero lagging problem. So I guess I should with using Tablet PC mainly just for sketching.
Sunday, November 18, 2007
Tricky FLEXLM aw.dat setting for Maya 2008
I was setting up the aw.dat file by putting the Ethernet address in it,but the license application refused it. Turns out it's because I put in the address shown on "FlexLM license utilities", and it includes all three of my Ethernet addresses: one for my physical network card, while two for my VMWare virtual network card. Removing the virtual ones and put in only the the Ethernet address of my physical network card solved the problem.
Sunday, November 11, 2007
Learning SketchUp 6 thru tutorial videos from SketchUp 5
It's very nice for Google to put up tons of videos for people to learn SketchUp. The problem, though, was that while the training videos are in version 5, the latest version is version 6, and there some UI difference between the two versions. For instance, the Display Setting feature become Styles. The color of line is now being set in Style setting instead of under the Window menu. No biggy, but cost me some time to find it out.
Friday, November 09, 2007
Photoshop CS3 with Wacom, problem solved
I installed Photoshop CS3 Extended and found Wacom working OK. So it's just the portable version that screwed up.
Photoshop CS3 with Wacom
Photoshop CS3 doesn't do pressure sensitive on my Wacom tablet! Could it be caused by the fact that I am using a Portable version?
Monday, November 05, 2007
CSS and Firework CS3 ... Sigh
Firework CS3 continuously having trouble running properly on my machine. After using it for a while, the left column of tool set will got all frozen for no good reason. I got so fed up that I quited using CS3 and using Firework MX 2004 instead. But MX 2004 has it's own problem:
- It doesn't provide as rich button transparency and shadow effect.
- It does not work with Aero class engine, forcing the UI to rollback to basic rendering.
Tuesday, October 23, 2007
Sunday, October 21, 2007
Color Match Tutorial video for Photoshop CS2
This video is awesome. After watching it, I completely understand how color matching works!
Text wrap changed in Illustrator CS3
I was trying to following the instruction at this site to apply text wrapping, but then later I found out from Adobe official site that the command for Text Wrap was changed in CS3.
In CS3, to create multiple column, I should first select text area, then select command [Type] [Area Type Options...].
To create Text wrap, I first select text and wrap around objects (on the top of the text), and then select menu [Object][Text Wrap][Make].
Not too bad.
In CS3, to create multiple column, I should first select text area, then select command [Type] [Area Type Options...].
To create Text wrap, I first select text and wrap around objects (on the top of the text), and then select menu [Object][Text Wrap][Make].
Not too bad.
Illustrator CS3 Problems to resolve
When I do design, I hate switching between my right brain (for creativity) and my left brain (for logical thinking). So I tend to clear up all the technical issues about design before I move ahead my design work. Right now I have these tasks that need to resolve, some Illustrator CS3 related while some Photoshop CS3 realted:
Photoshop CS3 related
Illustrator CS3 related
Photoshop CS3 related
- Figure out how to color correct a bunch of photos before working on composition.
Match the color in different images using Match Color command
Illustrator CS3 related
- Flow text around graphics.
Here's the solution. - Separate Text from text path
Turn outs it's more like you select a corner handle, and the drag a text area. It's very much link to the text flow - Hot Linkage between Photoshop CS3 and Illustrator CS3
This is in fact MUCH EASIER than I thought, and works even with my Portable version of Photoshop CS3 and Illustrator CS3. Here's how you do it: - In your Windows Explorer, make sure that psd file is associated to your Photoshop app. In my case I associated it to Photoshop CS3 portable.
- In Illustrator, select the imported psd object, and thus select the menu [Edit][Edit Original]
- Photoshop will be laoded, and so will your psd document. After you finish editing, save.
- When you get back to Illustrator, there will be a message saying that the source has change and ask for update confirmation. Accept it you got the modified psd object. Awesome.
I also found an awesome new feature in Photoshop CS3 for creating DuoTone photo from color photo. Just select [Image][Adjustment][Black & White]. This gives you much better control on converting photo to duotone. Awesome. - Add a think border to photo (from Photoshop)
- Short cut of Illustrator CS3. These short cust makes me feel like I am playing musical keyboard when working on graphic, but hell they are essential when I do a lot of graphic manipulation.
- Export Photoshop Path to Illustrator. This is easy.
- Copy layer between two Illustrator document.
This is supposed to be the solution.
But actually I found a better solution: use the [Edit] [Paste in Front] will paste the objects that I copied from one document to the new document and keep the position of all items. - Create transperant Glass effect in Illustrator
This site would be a good start .... keep searching ... - Learn how to use Live Color and Color Guide effectively.
This awesome video demonstrates what Live Color is about. - Figure out how to consistent join two object
Couldn't believe that I keep forgetting how to do it: - Select the two objects you wan to join.
- Bring up Pathfinder, click the union icon on "Shape Modes"
- select menu [Object][Expand Apperance...]
- done.
- Find out how to modify effect history.
Turns out the solution is pretty straight forward : Just bring up the "Appearance" Window and modify all the applied effects.
Monday, January 01, 2007
3D Studio Max 9 - At least it's stable
I was a bit frustrated by the 3D Studio Max 8 SP3. The application kept hanging up at some strange place. I finally got so feed up with it that I installed 3D Studio Max 9 and started using it. It seemed to work pretty well, and no crash so far.
Sunday, December 31, 2006
Animation render problem with 3D STudio Max SP3
I experienced something strange like this: if I render an animation with 3D Studio Max 8 SP3, and in the middle of the rendering process I tried to something else, the 3DS8 application will hang up. So whenever I render a 3D animation, I have to leave the computer alone all the way until it finish the rendering. It's great that I have a spare laptop, so here I am, working on my laptop. In fact, I think I may just install 3DSMax on this laptop. That way, I can use this laptop for time consuming render while I have my main computer doing something more useful, like work.
Saturday, December 02, 2006
A bug in Painter XI.5
Previously I had problem running Painter XI.5 after upgraded it from XI. Yesterday I finally figured out the reason: I forgot to reset the default setting, as instructed at the web site right next to the download link! (So, yeah, my bad).
So now Painter XI.5 is running smoothly on my machine.
However, I guess I stumbled across a Painter XI.5 bug. Try this:
(1) Create a new document.
(2) Add a layer (Layer 1)
(3) Select the Canvas layer, and then select [Canvas][Canvas Sizes...]. Add 400 pixels to bottom.
(4) Select layer 1
(5) Now try to draw at the bottom of the newly added area.
You will find out that you CANNOT paint in that area. However, try save the document and then reopen again. That bottom area in the layer 1 in now accessible.
Is it a well known bug, of something I discovered and should be reported to Corel?
Saturday, November 18, 2006
Painter XI.5 update
I tried Painter XI.5 update, and create an portable app using it. But it seems very unstable and crash everytime I tried to draw something on the Canvas. I wonder what the problem is. But in the meantime Painter XI will be were I stay.
Saturday, November 04, 2006
A bad habit to break
There was one tiny issue that sort of bugged me for a long while ever since I brought the Wacom Graphite 4 Tablet: that when I use Photoshop and Painter, I found that very once in a while I saw some dots got left inside the sketch of my drawing. At first I thought it was some setting problem, and it got to a point that I almost thought there's something wrong with the Wacom tablet. But today when I closely monitor how I sketch, I realized that the problem is actually on ME.
See, I have a tendency of slightly slamming the pen on the tablet surface even when I tried to draw a light line. I might intended to draw a smooth thin-then-thick-then-thin line, but my instinct tends to slam on the surface first before pulling all off to very light force. As the result, a spot was created. In fact, the tablet and the pen ACCURATELY and EXACTLY replicate what I did when the pen. It was just that I was in denial.
So I really need to practice sketch by breaking this bad habit. In fact, to think about it, I had the same habit when dancing by using all the force on preparation steps and thus ruin the whole thing. Gotta work on it.
Monday, October 23, 2006
Imperfection of the Maya 7 green version
It seems like everytime when I tried to apply material to an object in the green version of Maya 7 I made, the application will crash and burn. Oh well, I knew that hacking stuff is prompt to have problem :-I .
Saturday, August 19, 2006
Color Scheme resources, online and offline
I was trying to find a way to find a right color scheme in an organized way instead of random testing color. I eventually found this downloadable web based tool called "Color Scheme 2" which pretty much does my job. And the best part is that I can even put it in my Pocket PC! Although I have to say that it's pretty darn slow on my Pocket PC.
Other online color scheme resources:
- EasyRGB
- A bunch of color Tools online
- Pallette Test
- Color Palette Generator : Generate color palette based on a photo
- Color Palette Creator : Inspirated by this create palette article
Other online color scheme resources:
- EasyRGB
- A bunch of color Tools online
- Pallette Test
- Color Palette Generator : Generate color palette based on a photo
- Color Palette Creator : Inspirated by this create palette article
Suitcase 9.2 truly is portable
Just found out that Suitcase 9.2 true is portable! I create several set of font group on my home machine while the whole Suitcase 9.2 application is on my removable harddisk. I unplugged the harddisk and plugged it to my note, and found that all of my font groups are still there. This is awesome because that means wherever I go I got the same set of font group I organized.
Monday, August 14, 2006
Suitcase for Windows - Using font without comittment
I found it amazing cool that Extensis Suitacse 9.2 is actually portable friendly. Now I can have a font set in my removable harddisk, and access thse fonts wherever I go! Sure, it has problem preview the current system fonts, but all I care is the ease of accessing fonts on my USB HD, and for that it works good.
BTW, it's always a good idea to restart an application before using it after a set of font was activated, otherwise the font on the app will act strange.
As I expected, Suitcase has problem dealing with Chinese fonts, particularly:
- It does not work with Chinese .TTC (Font Collection).
- It cannot recognize Chinese font name, and display a blank name instead. And it even has problem loading more than one Chinese font since it sees all these attempteed to be added fonts with the same name, BLANK. There are some fonts that work though. Strange.
So I guess I need to find some way to rename a font and heck to make it work. Once a chinese font is being activiated, it works pretty well, though.
Wednesday, June 07, 2006
3D Studio Max 8 hanging problem seemed to be resolved.
Today I seemed to have 3D Studio Max 8 hanging problem resolved by turning OFF the Autobackup by the following checking off the following checkbox:
[Cutomize]->[Preferences ...] ->tab "File"->Auto Backup. [ ] Enable
I also set the viewpoint Display drivers to OpenGL instead of DirectX. I doubt about this is a related factor, though.
Now that I have the desktop one working OK, I am trying out the VMWare version and see how goes.
[Cutomize]->[Preferences ...] ->tab "File"->Auto Backup. [ ] Enable
I also set the viewpoint Display drivers to OpenGL instead of DirectX. I doubt about this is a related factor, though.
Now that I have the desktop one working OK, I am trying out the VMWare version and see how goes.
Cure 3D studio Max 8 crashing
I was a bit fustrated by the constant crashing of 3D STudio Max 8 on both my work machine and the VMWare. Maybe this article can help fixing some of the mess.
Tuesday, June 06, 2006
Installing 3D Studio Max 8 on VMWare
In order to faciliate my "3D modeling everywhere" dream, I have 3D Studio Max 8 installed on a VMWare system on my removable harddisk. It works pretty OK. The only catch it take I have to set the 3D engine to Software instead of DirectX or OpenGL. Other than that it seems fine.
I also have Service Pak 3 install. No problem encountered so far.
I also have Service Pak 3 install. No problem encountered so far.
Saturday, June 03, 2006
Strange thing about Painter IX with myGraphite 4 on my desktop PC
Last night I experienced something a little bit strange: the 2B Pencil tool in Painter IX doesn't look right on my desktop. I know this has nothing to do with Graphite 4, and probably has more to do with my display and the nVidia graphic card. The symptoms is this: it seems like the anti-alising was not done too well with the 2B Pencil. A lot of rough edges was formed on the screen, makes the result looked very odd.
I twisted left and right, and finally found that adjusting the min size and size step seems to help a little bit. But at the end, I blame the stupid LCD screen. :-m
I twisted left and right, and finally found that adjusting the min size and size step seems to help a little bit. But at the end, I blame the stupid LCD screen. :-m
Wednesday, May 31, 2006
Now I remembered why using Poser is such a fustrating experience
One thing that makes using Poser such a fustrating experience is that there's no simply way to lock a part while you trying to modify the other part of the body or props. So a lot of times I accidentally moved the parts I didn't want to move simply because the program didn't pick up the mouse click I had on the screen properly. Maybe there are ways to correct such a problem. Maybe there are ways to lock things properly. Obviously, I am still searching for it.
Dozens of artisitc animation shorts
You may have watched a lot animation shorts from YouTube.com. I found most of those clips entertaining more in the sense of teenager taste (lots of smashing, frating and such).
Recently I came across a site which host a dozen of more artistic animation shorts. They are candidates of a animation shorts competition, and I think they deserve you viewing time and vote. So take a lot at http://www.animex.net/audience and enjoy some nicely done animation short by today's young people.
Recently I came across a site which host a dozen of more artistic animation shorts. They are candidates of a animation shorts competition, and I think they deserve you viewing time and vote. So take a lot at http://www.animex.net/audience and enjoy some nicely done animation short by today's young people.
Endorphin version 2.5.2 Retail version?
Found NATURALMOTION ENDORPHIN VERSION 2.5.2's retail version at this web site. And it was like: is this for real. Fortunately it doesn't catch up to the retail version 2.6. But still, scary.
Tuesday, May 30, 2006
endorphin 2.6 - More links to fun download
Here's more link to downloads stuff related to Endorphin. I definitely will spend sometime to try it out:
- Community Forum for posting question and sharing information about Endorphin
- Download tons of tutorial video to learn Endorphin.
- Download the LE version
OH, and I found out that I can turn Endorphin 2.6 LE as a portable application. Sweet. Now I can learn it wherever I have access to a PC.
- Community Forum for posting question and sharing information about Endorphin
- Download tons of tutorial video to learn Endorphin.
- Download the LE version
OH, and I found out that I can turn Endorphin 2.6 LE as a portable application. Sweet. Now I can learn it wherever I have access to a PC.
Monday, May 29, 2006
Trying out my my Graphire 4
I brought my Graphire 4 to work so that I could spent some time to really try it out (sort of trying to optimize my lunch time) and had the following tidbit finding:
- I need to explictly trun on the tablet proption setting . By default it fully utilize the tablet area, but may not proptionally match the screen . This may create some ill effect when I sketch, so I definitely need to turn this feature on when I get back home.
- So far the best to sketch on the tablet is using Painter IX, and I haven't even start using any brush other than 2B Pencil :> . It feels very nature, and I really realized that what hidders me from making good sketch is just my drawing skill. Practice. Practice.
Natural Motion's Endoprhine LE 2.6 - Great toy
You can think of the Natural Motion's Endophrine LE 2.6 as a great 3D toy for you to see what happen if you push someone from the edge of a hill. Sadist, but hell, so is Poser >.:-} .
Sunday, May 28, 2006
Wacom Tablet pen not interchangable
I tested out 3 different Wacom tablet (ArtZ, Graphite 4 and FT-0405-U02 which actually is a Chinese writing recognition pad but using Wacom tablet), and found that each of them has special wireless pen and they are not interchangable.
Saturday, May 27, 2006
My first day of using Graphire 4 6x8 inch Tablet
Here I am testing the Wacom Graphire 4 6x8 inch Tablet on my home workstation (regular Pentium 4 2.8GHz with 1Gb of memory) and my notebook computer (Compaq Presario with P3 1GHz with 512M of RAM). Here's some of the finding I had so far:
- So far I love the new Wacom. Using the 6 x 8 is really a much better sketching experience comparing with my old 5 x 4 pad.
- I was a bit upset that the old pen that comes with old ArtZ tablet does not work with Graphire 4. But then I was EVEN MORE UPSET when I found out that the few test stroke I made on the Graphire 4 tablet using the old ArtZ pen left a few NON-DESTRUCTIVE but visible mark on the tablet. Again, it's non-destructive and it didn't really scratch the surface. It just left some visible mark. But then, AHHHHhhhh my supposed to be perfect tablet now has a few scare by it's grandma model !! The new pen is of course perfect fit for the new tablet and left no scar on the surface no matter how hard I sketch.
- I got the Pearl white model. Now this little baby will look totally match with the MacMini Intel version that I most probably will get in the future. Sweet :->
- The price I paid seems very reasonable: HK$1199 - Hk$150 Wacom ArtZ tablet trade in --> So I paid HK$1049 for the tablet as the result. Very nice price consider that amazon.com is selling it at $172.98 . With sales tax, it will cost HK$1463. And can someone tell me why the pearl white model is the most expansive one among all models. Is it simply because it matches the MacMini better?
- My old Artz was made in Japan. This new pad is made in China. Nothing. Just a note.
- Now I have completely no excuse of the tablet making me draw badly. If the sketch looks badly, it's because me myself.
- I experience some minor glitch which I don't think it's the problem of the tablet, but rather the way Painter IX interpret some pen stroke. I sometime got a tiny dot when I use pen/pencil to shade an area. Guess I need to experiment more to find a work around to the problem.
- I also experience something interesting: on both the desktop PC and the laptop, the Photoshop CS and Painter IX has no problem keeping up with my sketching on it (I use pencil tool) no matter how fast I draw, but openCanvas 3.03 and 4.03 has problem, and created some angled lines if I draw too fast. Interesting enough, the problem was not as obvious on the laptop as on the desktop, which is strange consider that my laptop has less CPU power. But then the screen on my desktop is much bigger (1280x1024 on desktop, while 1024 x 768 on laptop).
- I really need to keep the tablet away from my 4 year old nephew. Within the last 5 hours he had multiple attempts to use things other than the tablet pen to draw on the Graphire 4. Obviously he thought my tablet can tolerant that same kind of abuse he imposed on his Doddle Doddle pad. The destruction power of children is simply unbelievable. Time to execute the South Park plan: kick the baby.
- Without installing the driver, the tablet will work as a generic tablet but only utilize 3/5 of the tablet space. After installing the driver it optimized the tablet surface utilization to the max.
- For some strange reason, I found using my laptop with my Graphire 4 a slightly better sketching experience than using the desktop. This is probably due to the cleaner environment (much less crappy installed on my laptop). This is a great founding. It proves that even though my laptop is about 5 years old, it's still very capable as a mobile creative station. I have no problem using it with my M-Audio Firewire Solo, and now with my Graphire 4. Nice.
- I found myself enjoying the wheel and the two button on the tablet very much. I mapped the left button to space so that I can use it to zoom in. And then I mapped the right button to Control. The scroll becomes zoom on Painter. Very very handy.
- I may even start to permenatly hook the tablet to the laptop so that I can sketch whenever I feel like knowing that my laptop is on all the time.
- I am NOT going to install any software that comes with the tablet. They are all cheesy version of software that I already have. Maybe I'll use those software for future upgrade, though.
Friday, May 26, 2006
Say goodbye to my 10 years old Wacom ArtZ Pad
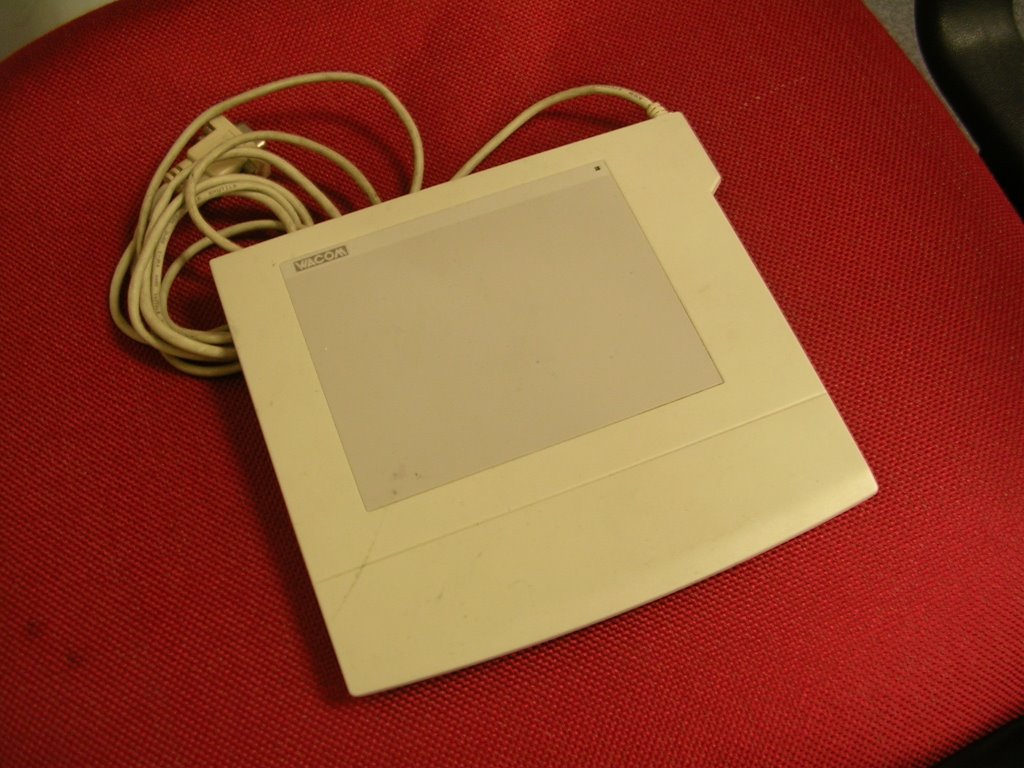
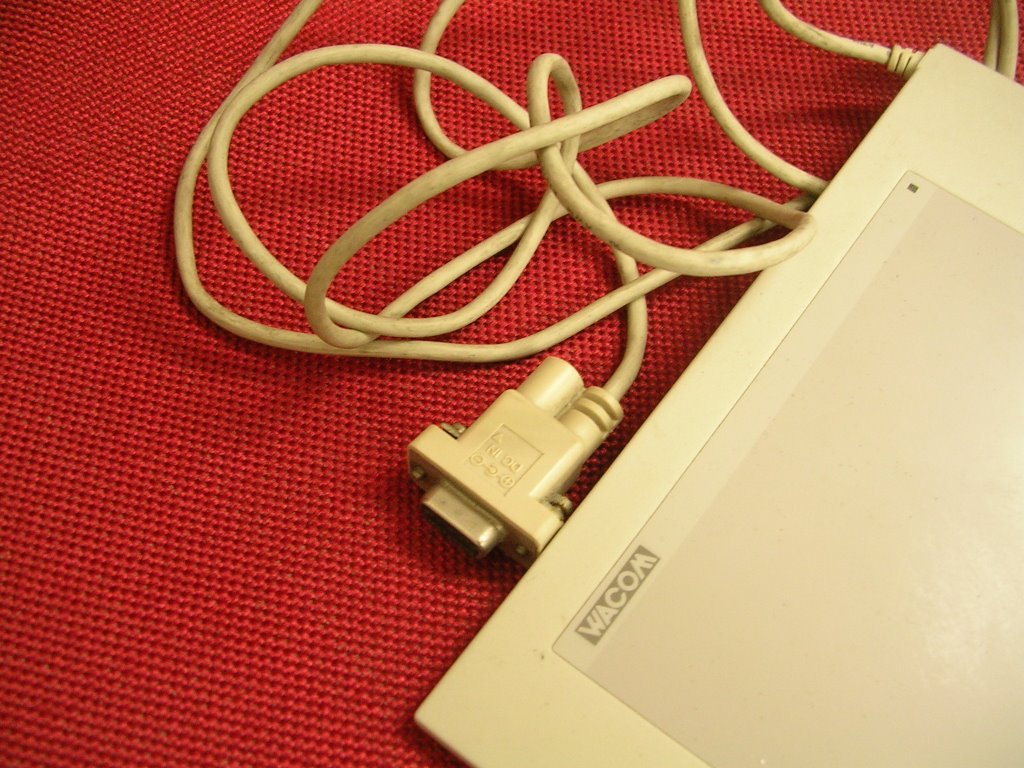
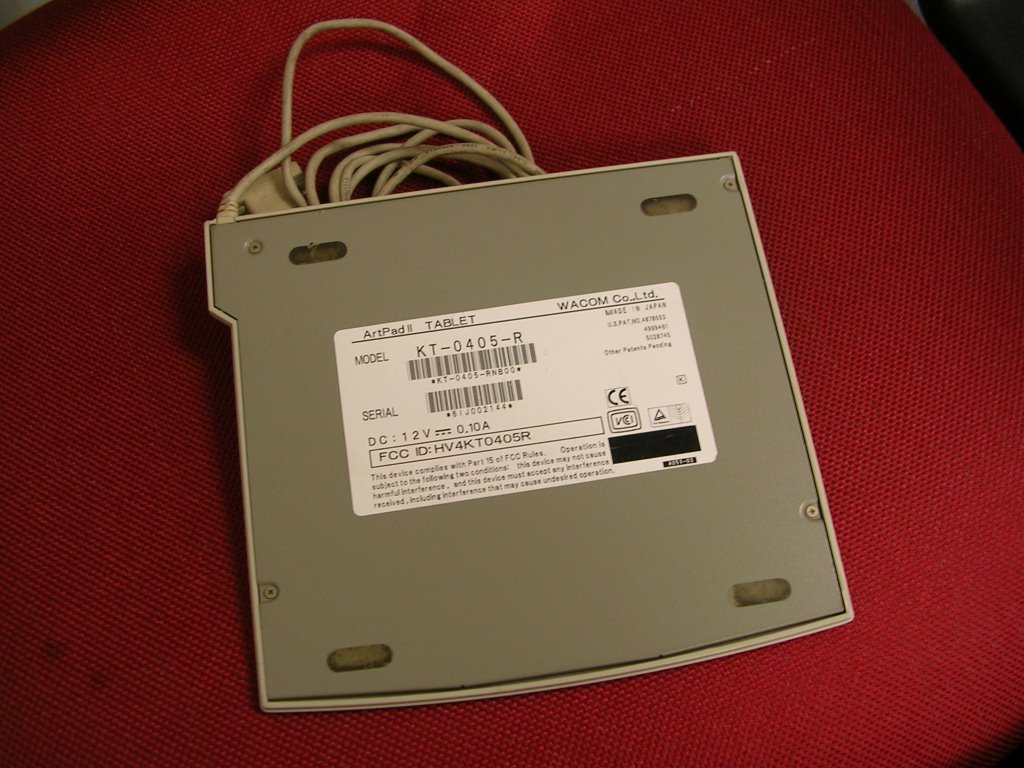

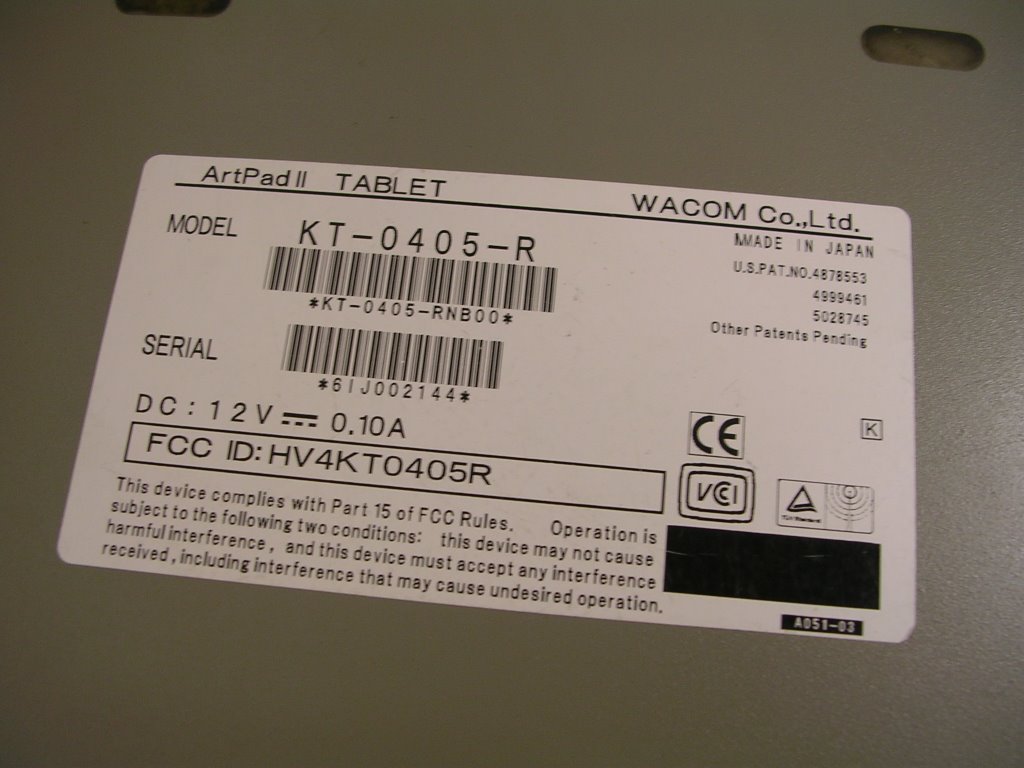
I am going to say goodbye to my 10 years old serial port ArtZ Pad. Here's all the photos that I took before I send it to the shop and use it as a HK$150 trade-in rebate.
Goodbye. ArtZ. I will miss you.
And HELLO my new 6x8 Graphire 4 :-D .
Tuesday, May 23, 2006
I just found out that Manga Studio 3 Debut cannot be installed on Windows Server 2003 since the installation program will abort in the middle of the installation process. However, Windows XP runs smoothly. In fact, I can make a portable version of it and put it in my removable harddisk. Totally sweet :> .
By the way, I found this trial version from a mainland China site.
By the way, I found this trial version from a mainland China site.
Poser 6 tutorial, and more
I like it when graphic tool companies spent time and effort to put up nice tutorial so that user can optimize the usage of the tool. eFrontier knows that well, so they put up some good introduction tutorial for me to learn their apps:
- Posing 101- Getting Started
- Getting Started with Manga Studio
- More about Posing in Poser
- More Manga Studio tutorial
-
- Posing 101- Getting Started
- Getting Started with Manga Studio
- More about Posing in Poser
- More Manga Studio tutorial
-
Monday, May 22, 2006
Cool stuffs from eFrontier
Seems like this company - eFroniter - does some very intersting stuff.
For one, they have two very nice Poser models: Terai Yuki 2 for Poser 6 and Miki CE for Poser 6.
And then they have a Manga tool called manga Studio.
For one, they have two very nice Poser models: Terai Yuki 2 for Poser 6 and Miki CE for Poser 6.
And then they have a Manga tool called manga Studio.
Monday, May 15, 2006
To buy Intuos3 or not
I was not thinking of getting the Intuos3 until I saw the ad about trading in an old wacom tablet to get a new Graphire4 or a new Intuos3 table. And later I figured out the difference between the two new Graphire 4 (US Price) and Intuos3 (with Tilt feature and such).
Wednesday, May 03, 2006
Using Photoshop to prepare transparency for Lightwave
I found this article a useful reference about creating alpha channel for preparing transparency for Lightwave texture mapping.
Tuesday, May 02, 2006
LW 8.5 - Animate against a video background
Here's the simple way to animate against a video (I tried a VCD MPEG video) in Lightwave 3D:
- Press {F6},
- Select your footage,
- Press {Ctrl+F7},
- Set your footage as a BG Image,
- Press {d},
- Set "Camera View BG" to "BG Image",
- Animate your logo,
- Setup the [RenderOption -> Output Files] tab,
- Press {F10}.
Friday, April 14, 2006
Struggling with Lightwave texture mapping and alpha channel
I am struggling to make transparent texture mapping working with Lightwave 3D 8. Here's two articles that I think maybe helpful to me:
- How to i get my Alpha channel to work in Lightwave?
- Texturing & Modeling in L[6]
- How to i get my Alpha channel to work in Lightwave?
- Texturing & Modeling in L[6]
Saturday, April 08, 2006
Finally, the way to make my Lightwave green version complete
I am studying texture mapping these days, and found that Lightwave 8 comes with great Texture Mapping capability without using other UV Mapping specific application. However along the way I was a bit confused about the role of bump map, so I read a bit from this article to get some general idea.
I also enjoy the fact that the tutorial help file that comes with Lightwave 8 is also available online so that I can access it everywhere I go.
My biggest discovery today, though, is that there's a way to load all the plug-in when I use the portable (green) version of Lightwave 8. That way I can import EPSF files, use JPEG image during texture mapping, render a scene and export it to JPEG and so on.
To import all plug-in with a Lightwave 8 portable version:
Under [Utilities] tab, click Edit Plugins (or Alt F11), Click [Scsn Directory] button on the Edit Plug-in window. In "Browser for Folder", select the whole "Lightwave [8]" folder. When done scanning, click [OK}, and click [Done]. Now when you go to [File][Import], you will find options that you never had before.
Wednesday, April 05, 2006
Problem loading JPEG image map and EPS file
I have problem loading JPEG image and EPS file with the green version I made. Installing the versions in APPS_051115 didn't have neither. And it seems like there does not exist Lightwave 8 demo.
Guess I need to try the 8.0 in APPs_040528 .
Guess I need to try the 8.0 in APPs_040528 .
Subscribe to:
Posts (Atom)